Posts Tagged ‘lawn care’

When Should I Start Mowing My Lawn?

Tuesday, March 27th, 2018

As days get longer and temps warm up, homeowners start looking at their lawn and wondering when they should start cutting it. This is especially true now that long-standing weather patterns are fluctuating; where in seasons past, you may have known you could wait until April to start cutting the grass. But if you’re faced with an unseasonably mild winter, you should pay close attention to what the grass is doing.

What you want to look for is height, not a specific date. You should have cut the grass short at the end of the fall growing season; now, you want to wait to cut it until it is at least 2 inches tall. Cutting it when it’s too short will make your lawn susceptible to disease; waiting until your lawn is at least 2 inches protects the roots. And don’t cut your grass too short in the spring. Never remove more than a third of its length in a single mowing.

With unpredictable spring weather, you may end up with a week of above average temperatures that starts the grass growing, then a period of freezing temps at night again. If grass is long, you should wait until the frost is off the leaves and temperatures have warmed up for the day. You may be better off waiting until the period of freezing temperatures ends, however.

Before you go out to mow for that first time, take the time to check your mower setup. Make sure blades are sharp and that your mower height is adjusted correctly. You should also check that the mower is leveled front to back and side to side; a mower that is not level may scalp some of your lawn and leave other parts too long.

When Should I Fertilize My Lawn?

Spring fertilization is important because it provides the nutrients that your lawn needs as it comes out of dormancy and begins to grow for the season. It’s a good idea to fertilize the lawn between late February and early April, before you start to mow for the season. If you plan on overseeding your lawn, be sure your fertilizer doesn’t include a weed killer, as this will prevent grass seeds from germinating.

How Often Should I Water My Lawn?

Spring rains typically mean you won’t need to water your lawn much in the spring, unless your area is experiencing a drier than average spring. If that’s the case, you may want to wait until the grass starts to droop slightly. Experts suggest that this can help signal to the roots that they should grow deeper to deal with a dry period. Water deeply, about an inch at a time, once a week.

Following these guidelines can help you get your lawn off to a great start this year.

Why You Should Aerate and Overseed this Spring

Thursday, March 22nd, 2018

Many lawn care professionals and homeowners think that fall is the time to aerate and overseed. But there are good reasons for aerating in the spring instead – including if you didn’t do it in the fall. If you’re facing damaged spots, bare patches, or thinning due to foot traffic, consider adding aeration to your spring to-do list.

Spring Aeration

Thorough aeration opens up the roots, allowing them to take in more oxygen, nutrients and water. Aerating in the spring takes advantage of the grass’s natural growth cycle, delivering more nutrients and oxygen when plants may need it most. Aeration is best timed for just before or during high growth, but not before or during high stress periods, like extreme heat or drought. This makes spring, with cool temps and plentiful rain, an ideal time for aerating cool season grasses. (Late spring and early summer is an ideal time for aerating warm season grasses.)

Don’t start out your spring lawn care with aeration, though. Mow two or three times to be sure the grass is growing fast enough to take advantage of increased air exchange in the root zone. This will also give you a better idea of how healthy your lawn is and whether you should overseed after aerating.

One caveat to spring aeration: Grass is not the only plant taking advantage of spring growth cycles. Weeds are, too, and aerating can bring buried seeds to the surface of your lawn, where they germinate and increase weed competition. Fertilizing and using a pre-emergent weed killer can reduce the potential for weeds after aeration. If you’ll be overseeding thin and bare areas, skip the weed killer, as this will prevent your grass seeds from germinating.

Spring Overseeding

Overseeding after aeration will provide fresh growth, and give it a fuller, thicker appearance. Overseed when there’s abundant rain and sunshine; you’ll also want to be past the last frost date, as frost will kill tender young roots. Overseeding can set your lawn up for success later in the season, as a thick, healthy lawn will be better able to withstand summer stresses.

How Often Should I Aerate My Lawn?

Experts recommend aerating and overseeding at least once per year. For lawns with heavily compacted soil or a high clay content, aerating twice a year may be best.

Equipment

If you’re a lawn care professional, you may need to add equipment to your fleet in order to accomplish these tasks. Exmark aerators come in a variety of styles and sizes (from the 21” walk behind to the 24” and 30” stand-on models), offering high maneuverability and efficiency. For overseeding, we offer both a ride-on spreader-sprayer with lean-to-steer technology, and a commercial slicer seeder that verticuts, dethatches and seeds in one pass. Like all Exmark equipment, our turf management products are designed to be intuitive, long-lasting, and deliver unmatched efficiency.

How to Prevent Spring Weeds from Taking Root in Your Lawn

Thursday, January 25th, 2018

As the snow melts and temperatures warm, it’s not just your grass that springs back to life. Weeds and especially dandelions are just waiting to take root in your lawn, plantings and other areas. While weed killer has a definite role, it shouldn’t be your main line of defense. An ounce of prevention is worth a pound of cure, so here are other ways to prevent weeds from taking over your lawn.

Weeds, especially dandelions, are opportunists, so minimize the opportunity. As soon as you can this spring, you’ll want to aerate, dethatch and overseed your lawn, paying particular attention to any bare spots. This will provide more oxygen to your lawn’s roots, and make it easier for nutrients to reach the soil for absorption. The result will be a healthier, fuller lawn that provides less opportunity for dandelions and other wind-dispersed weeds like milkweed, as well as perennial pests like broadleaf plantain.

If you live in an area where wind-dispersed weeds are a particular problem, be sure to mulch flower beds and bare areas around trees or other plantings early in the spring. A good mulch layer will make it easier to remove any dandelions or other undesirable plants before they turn to seed and spread across your lawn.

Once new grass growth is well established, fertilize your lawn. Besides keeping your grass healthy, this will help prevent weeds that are attracted to low nitrogen or poor soils, like white clover or creeping Charlie. As trees leaf out and create thin or bare patches due to shade, seed those areas with a shade tolerant seed to help prevent violets and other shade-loving weeds.

Your watering and mowing habits can also prevent weed growth. Under watering your lawn creates ideal conditions for weeds like purslane, especially in newly seeded areas, while broadleaf plantain loves an overwatered lawn. Similarly, scalping your lawn by cutting too short creates conditions where crabgrass can take over, so be sure your mower settings are right for your type of grass and region.

Once weeds start to appear, you’ll need to treat them. Some weeds, like chickweed or broadleaf plantain, can be pulled by hand if there are just a few plants. You may need to dig out small patches of clover or creeping Charlie and then seed the area immediately. For dandelions, cut the flowers off to prevent them from going to seed. You should also dig them out, being sure to get at least 2-inches of the tap-root.

Should your lawn go from a few weeds that can be managed by hand to a full-scale invasion, get out the post-emergent herbicide and apply directly to the plants. If the weeds are taking over tender new grass that is trying to establish itself, it may be best to dip a paintbrush in the herbicide and paint the leaves of the weeds, rather than spraying.

One final note: If your lawn is really weedy, it may be a good idea to clean off the mower when you’re done, to prevent seeds from being deposited back into your lawn the next time. That’s because seeds can cling to the mower; starting up and mowing the next time can then disperse them into your lawn again, canceling out any efforts you made to clean up the weeds between mowing. To avoid transporting and dispersing seeds to another lawn, it’s a good idea to clean the mower before you move on to the next job site.

Plan Now to Get the Lawn and Landscape You Want Next Spring

Thursday, January 4th, 2018

It’s December. Your lawn may be covered with snow, but now is the time to start planning. Whether you have bare patches you need to fill in or you’re planning a new landscape design, starting now will ensure you get the lawn you want next year.

Make note of the problems you need to fix. Bare patches, mole hills, crab grass: Whatever ails your lawn, research both the issue you have and the best time to address it. Also decide whether you’re the right person to take care of it – not everyone wants to trap moles, after all—or whether you’d be better off hiring a contractor. You may have multiple issues to address, in which case, schedule them out, even if it’s as informal as aerate and fertilize in the spring, then over-seed.

Once you have the basic projects scoped out, an idea of when to do them, as well as their costs if you’re  hiring someone to do them, start thinking about the other projects. Do you want to add outdoor features, like a patio, fire pit or water feature? Take the time now to look at designs and figure out exactly what you want. That way, you’ll be ready to go when the weather warms up and work can begin, and you’ll be able to get more use out of your yard than if you’d waited until July to decide what you wanted. You may also be happier with the results, if you take the time to research options and pick the design and materials that you like best.

January and February are also a great time to gather plant catalogs and think about plantings that will make your lush green lawn stand out. Spend some time with nursery and plant catalogs, or go online to nursery websites. Think not just about which plants will enhance your house and lawn, but what’s the best way to arrange them and how much effort you want to put into maintenance. If you don’t want to do the labor yourself, it’s best to start looking for a landscape designer well before the temperature warms up. Even if you’re going with a designer and contracted labor, you should have an idea of how you want your yard to look. A good landscaper will take your ideas and work with them so that your plantings grow in and look great in five years, not just the year they were planted.

Don’t forget to budget carefully, especially if you have ambitious plans. You may want to prioritize which features you have to have, and which would be nice but are optional. Or you can make it a several season process, installing the most important features first, and saving the optional ones for next year.

With planning and care, your yard can be the envy of the neighborhood, so use the cold weather months to your advantage. Don’t know where to start? Check out these lawn and garden DIY videos for project ideas and lawn care tips.

Why You Should Rake and Bag or Mulch Your Leaves in the Fall

Wednesday, November 29th, 2017

As leaves fall, you may be tempted to just leave them, especially if your property has a lot of trees. For a variety of reasons, this is a bad idea. While it may look okay at first, as rain and snow begin to break down the leaves, they will blacken and become a slick mess. The longer you leave them, the wetter and harder to clean up they’ll become.  The extra moisture on your lawn can also lead to diseases like snow mold, which will result in circular brown patches on your lawn next spring.

Why You Should Mulch Your Leaves

Leaves are full of nutrients. Your lawn needs nutrients. Mulching your leaves delivers those nutrients to your lawn, and involves less work than taking the time to rake and bag leaves. And, you don’t have to pay for nitrogen-based fertilizers. So, it’s better for your lawn, less work, and less expensive.

If you’re a gardener, you may want to consider composting your leaves, and use the compost on flower or vegetable gardens. Simply place the leaves into a large bin, add other compostable material like vegetable waste, plant and garden trimmings, and rake or stir once or twice month to speed up decomposition.

Aren’t Leaves – Especially Oak Leaves—Bad for My Lawn?

No. This is an old wives’ tale that may have come about because wet leaves left on lawns over winter can cause damage or disease. All leaves, even oak leaves, contain nutrients that are beneficial to your lawn. Finely mulched leaves will deliver those nutrients to you lawn.

When You Should Rake and Remove Leaves

If you regularly fertilize your lawn, mulching may be too much of a good thing. In this case, you may want to rake and bag leaves. Some communities will collect leaves for mulching and make the mulch available to residents for use in their gardens.

How Often Do I Need to Remove Leaves?

You’ll need to remove leaves throughout the fall. Depending on where you live, this may last four to six weeks. Doing it in stages, rather than waiting until all the leaves are down, may end up being less work in the long run. If you’re mulching the leaves, your mower may be unable to handle a thick carpet of leaves as efficiently, leading to more passes and larger pieces of mulch.

When to Stop Mowing in the Fall

Tuesday, November 21st, 2017

When to stop mowing in the fall is a perennial question. Some homeowners stop as soon as the frost hits, but as warm weather is pushing frost dates from early- to mid-October into late October and early November, this is a bad idea.  Leaving your lawn too long over the winter can leave it vulnerable to disease and will make your first mow in the spring more challenging.

Rather than focusing on a date when you think you it is okay to stop mowing, make the decision to stop based on what your grass is doing. This will depend on both your zone, the current weather patterns, your microclimate (urban heat islands versus rural areas), and whether you have a cool season or a warm season grass. Cool season grasses like fescue, rye grass and Kentucky blue grass will grow at a faster rate through the cooler fall days than warm season grasses like bermuda or zoysia grass.

While your grass is growing, you should keep cutting it. If growth has slowed, you may be able to stretch the period between mowing, or you can adjust the mower height and take a little less off. Once the grass has stopped growing, give it a final, shorter trim—about two inches for cool season grasses—to keep it tidy through the winter and to protect it from diseases like snow mold, which can occur if it snows before the grass is completely dormant. Be sure your mower blades are sharp before that final trim, as torn or damaged grass leaves can lead to disease.

In the event of a freak snow or ice storm followed by a return to warmer, dryer temperatures for an extended period of time, use caution. Be sure that the grass has dried thoroughly before you try to mow, and do not do so immediately after, while the grass is frozen or wet.

If necessary after your final mow, you should continue to rake or mulch your leaves; if you rake, you may wish to use a quick-release fertilizer on your lawn. The roots will absorb the nitrogen over the winter, giving your lawn a boost in the spring. Use a quick release rather than a slow release formula, because you don’t want too much nitrogen in the spring when grass will have its main growth period anyway. Aerating the lawn will allow the fertilizer and oxygen to penetrate deeper into the soil. Aerating will also break up the thatch layer, which will result in better growth in the spring.

While you may be tired of mowing by late-October or early-November, keep it up so long as your grass grows. Doing so will help protect your lawn from disease over the winter, and set you up for a healthier, lusher lawn in the spring.

How Often Do I Need to Water?

Tuesday, July 4th, 2017

Watering the lawn is trickier than most people realize. Even with an automated sprinkler system, it can be difficult to strike that perfect balance between under-watering and over-watering the grass. This is especially true once you take seasonal and regional issues into consideration. After all, what works in Georgia in the summer won’t necessarily apply to Utah in the spring.

Although you should always consult a specialist in your area to set up a truly accurate course of landscaping care, this general guide to seasonal watering should give you an idea of where to start.

Cool-Season Grasses

Cool-season grasses are those that can survive hot summers and freezing winters. They’re mostly found in the northern regions of the United States, and the bulk of their growth takes place in spring and fall.

Spring: Most cool-season regions experience heavy rainfall in the spring, which means you won’t water your lawn as often or as much. Spring is when the grass will do most of its growing since it’s awakening from winter hibernation and taking advantage of all the natural moisture.

You may need to water if you are experiencing less-than-average rainfall or if your lawn is covered in areas (because of trees or other growth). As temperatures rise, you may need to start watering more frequently.

Summer: By the time June hits, your lawn should be getting 1-inch of water per week (from both rainfall and your watering). Your grass will stay green for as long as you maintain this water level. Rising temperatures and lawns in direct sunlight may require watering more often and on a different schedule. It’s best to water cool-season grasses early in the morning so that the grass holds its moisture for longer.

In especially dry summers, maintaining this much water can be difficult—especially if you live somewhere with water restrictions. Fortunately, it’s okay to let your cool-season grass turn dry and brown if needed. This doesn’t mean your grass is dead; it’s merely dormant. It might not look great, but growth should pick up again in the fall.

Fall: Fall tends to be less wet than spring but not as hot as summer, so you can typically cut your watering regimen in half. You’ll still want to maintain a healthy level of moisture, especially if you’ll be doing any seeding or planting at this time.

By the time temperatures are below freezing overnight, you can stop watering for the year. The grass will go into dormancy until spring hits and the cycle starts all over again.

Warm-Season Grasses

Warm-season grasses thrive in tropical regions, where temperatures are high and there is a lot of natural moisture in the air. Unlike cool-season grasses, most of the growth will take place in the heat of the summer. During fall and winter, the grass will turn brown and lie dormant until spring.

Late Winter/Early Spring: Spring comes early in tropical regions, so expect the growth cycle to start sometime in January or February. Depending on how much humidity your region is experiencing, this may mean you’ll need to start watering early on.

Spring: By the time May hits, your lawn should be getting between 1 and 1.25 inches of moisture every week. This number includes both the watering you do at home and natural precipitation, so bear in mind what’s happening in your region regarding the weather.

Summer: Your grass is likely to flourish during the summer with or without your assistance. The best thing you can do during this time is paying attention to local conditions. If it’s been an abnormally dry year, you may have to do some watering; however, most homeowners will find that warm-season grass performs well in an atypical year.

Fall: Come September, it’s time to reduce the amount of watering you do. As rains increase and temperatures drop, chances are your lawn is going to get more water than it needs—not less.

Winter: Although your lawn may be dormant by the time winter hits, a lawn that’s been recently seeded or is continuing to thrive may need watering during November and December. This should be done to supplement any natural rainfall.

Remember, every lawn and every region is different, so it’s best to tailor your watering schedule to your climate and grass species. Contact a local expert and come up with a plan of action. Your lawn will thank you!

Done in a Weekend Project: Get Fired Up

Thursday, June 22nd, 2017

Once the landscaping takes shape and you’re enjoying your outdoor living space, it’s a good idea to introduce enrichment projects. These small, weekend jobs transform your yard into a place where people want to gather—an extension of your home that enhances your square footage without any major building.

And one of the best ways to do this? A fire pit. No matter what the weather, a fire pit provides comfort and a place for the whole family to enjoy. In this Done-in-a-Weekend series project, we’ll look at what it takes to create a safe and beautiful space for your fire pit.

Before you do any kind of landscaping or work on a fire pit, make sure you find out what your local safety regulations are. There may be fire code restrictions or HOA considerations, so follow the rules and always make sure you update your homeowner’s insurance accordingly.

For the easiest approach to a fire pit, we suggest purchasing the pit and putting your focus on the environment. Here’s how:

  1. Choose a Location. The location should be at least ten feet from any structures or outbuildings. It should also include room for both the fire pit and seating around it.
  2. Mark the Space. In order to get the best results (around 15-18 feet in diameter), mark the space you’ll be clearing using careful measurements.
  3. Prep the Area. This includes removing debris, grass, dirt, and/or other items in the way and also leveling the ground.
  4. Build a Border. A stone border is a great way to transition from your yard to your fire pit space.
  5. Put Down Flooring. Go simple with rocks or stone. Class it up with brick or pavers. It all depends on the look you want and the amount of money you’re willing to invest.
  6. Place the Pit. Here’s where things start to get fun. Place and secure the pit in the center of the space, and you’re almost ready to go.

Decorate. Set up chairs and tables. Build decorative accents. Put in some potted plants or and other décor to put your personal touch on the fire pit patio.

The best part of weekend projects like building a fire pit is that you can enjoy it at the end of the weekend. Sit back, grab some marshmallows, and enjoy a great new place for the whole family to come together.

Done in a Weekend Project: Walk This Way

Wednesday, June 14th, 2017

Walks and pathways are a great way to improve the appearance of your landscaping, and unlike planting, it doesn’t need to be done at a particular time of year. Whether you’re hoping to connect outdoor spaces like sidewalks, driveways, patios and pools, or simply want a more harmonious outdoor space, a neatly laid walkway creates both a focal point and better flow in your yard.

If you’re ready to get started on this weekend project, take a look at the video in our Done-in-a-Weekend series. Or, you can keep reading for tips and pointers on making the most of your walkway.

The most cost-effective way to create a walkway is to rely on a combination of gravel and/or mulch. Easy to lay down and without a hefty price tag, the gravel/mulch option allows you to bring your vision to life in a matter of hours.

For a more permanent and stable solution, however, you can turn to pavers. These will require a bigger time investment and will most likely come with higher costs, but you’ll increase your points of access to high-traffic areas without damaging your lawn.

The tools and supplies you’ll need for this project include:

  • Measuring tape
  • Sod cutter
  • Leveling tool
  • Sand, crushed concrete, and/or fine gravel to act as a paver base
  • Paving stones
  • Edging stones

As is always the case before you start any project that requires you to break up the ground, be sure to call 811 for safe digging. You should also walk the path several times after it is completed to ensure there are no trip hazards or loose stones.

Done in a Weekend: Liquid Bliss

Friday, June 9th, 2017

By Doug Scott, Landscape Designer
Redeem Your Ground, Atlanta, GA

Liquid Bliss

Aside from the serene and restful spaces that running or bubbling water help create, water features add interest and beauty to landscapes not only with their form, but potentially through the unique plants that grow in and around them, and the wildlife that they attract. When used strategically within a landscape design, they can also serve to anchor an inviting gathering space to create a picture-perfect focal point to be seen and enjoyed from both inside or outside your home.

Ultimately, water features help create the perfect spot to start your day off right, or to unwind by at the end of a long day . . . and really, anytime in between. Some might say they provide an element of liquid bliss.

There are a wide variety of water features to choose from that will allow you to achieve your specific goals, so here are a few general types worth considering. Hopefully, these recommendations will help you choose the one that will provide enjoyment for you and your family for years to come.

Fountains

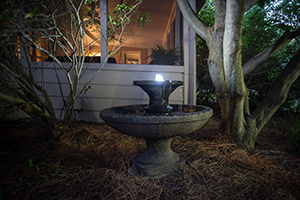
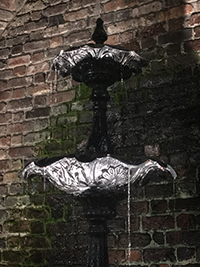
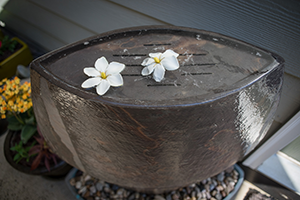
Fountains are perhaps the most common type of water feature that can be added to your landscape. That’s likely due to a number of reasons:

  • They come in a variety of shapes, colors and styles. From classic tiered fountains, colorful urns and funky objects, to extravagant installations or a simple stone with a bubbler atop it, there’s a fountain option that will meet any design aesthetic.
  • There are options that will fit any budget—big or small.
  • There are very large fountains that you could consider (if your budget allows), as well as small options that will work within the smallest of spaces.
  • Compared to the other types of available water features, many fountain options are relatively easy to source from a number of retailers, then install yourself and maintain.
 fountain fountain fountain

For these reasons, most of the water features I’ve installed for clients have been of the fountain variety. They effectively achieve the “bubbling-water sound” objective that most people are looking for, while fitting both their space and budget constraints, as well.

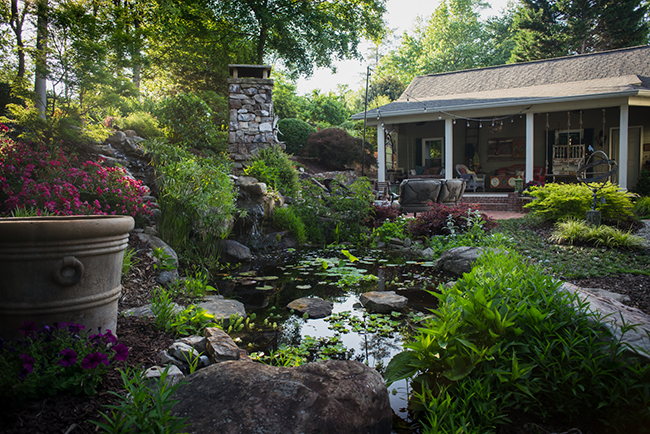
Water Gardens & Fish Ponds

If you’re wanting to bring life to your outdoor spaces in the truest sense, water gardens and fish ponds do just that.

Water gardens are exactly what their name implies: a garden of plants that live in and around water. They provide you with the opportunity to include unique plants in your landscape, bringing with them vibrant colors and interesting structures. Common water garden plants are horsetail, water lettuce, water lilies, blue iris and sweet flag. Note that water gardens are best when incorporated in a more natural, lush setting.

Pond

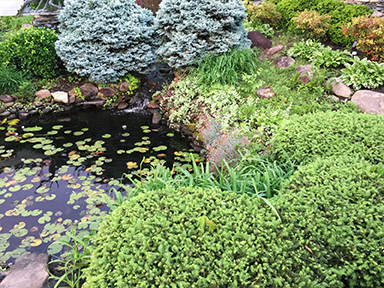
Like water gardens, fish ponds are most often incorporated into more naturalized landscapes. Likewise, the plants used in fish ponds are the same as in water gardens. The added bonus with fish ponds, however, is that you’ll be able to enjoy the fish you’re providing a home for—koi and goldfish being the most common.

Fish

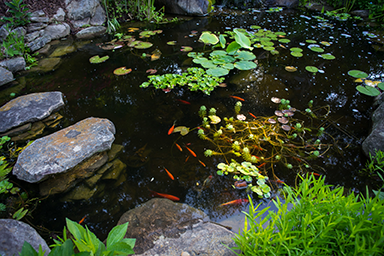
The primary difference between water gardens and fish ponds is that fish ponds must be able to sustain the fish that will reside in them. This not only adds to the cost and complexity of starting a fish pond, but the ongoing maintenance that’s involved, as well. For instance:

  • Fish need oxygen, so you must have a pump that circulates and aerates the water.
  • You must have appropriate types of vegetation, as well. That’s because plants serve three vital functions in your fish pond:
    • They produce oxygen.
    • They provide a great natural source of food.
    • They not only help beautify the space, but also provide cover from predators, as well as shade from the beaming sun. (It’s recommended that about half of the pond have some sort of shade.)

Given that both water gardens and fish ponds can serve as a ready source of water, food and habitat, they provide the added bonus of attracting all sorts of wildlife. But, this can be both a good and bad thing.

Let’s start with the bad. If you’re raising fish, you’ll have to watch out for predators that come from both land and air. Cats, possums, raccoons, foxes and birds (like herons, seagulls, and kingfishers) are known to feast on fish.

Although there’s no fail-safe way to prevent the unthinkable, a three-pronged approach to safeguard against predators is recommended:

  1. Provide your fish cover (somewhere to hide), as mentioned above.
  2. Like in a vegetable garden, place an owl decoy nearby to deter unwanted attacks.
  3. Although not very attractive, you could install a net over your fish pond.

Now, with the bad out of the way, there’s also the good wildlife that’s attracted to a water garden or fish pond. Amphibians like frogs and toads (though, they can pose a problem with fish ponds, so watch for that), birds (the colorful, cute kind, not the predatory kind), and beneficial insects like dragonflies and water spiders are sure to take up residence in this type of water feature.

For obvious reasons, adding a water feature to your yard is a much more involved endeavor than a fountain that you simply pull out of a box and plug in. However, if you’re up for the challenge, the life they will bring to you and your family outside is endless.

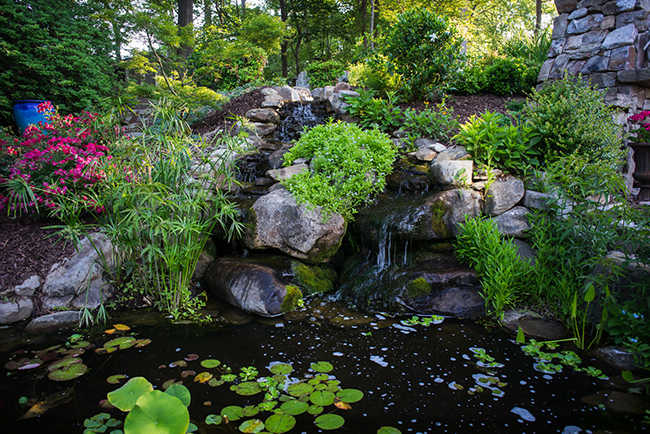
Streams & Waterfalls

Lastly, streams and waterfalls are another great water feature option to consider if the goal is to add natural beauty and movement to your landscape. Although they can be installed individually, waterfalls and streams are often used together, and can even be incorporated with a water garden or fish pond.

Streams

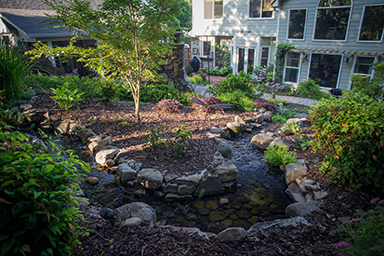
Like a garden path, streams help create a more natural, meandering setting . This provides you with the opportunity to connect the visual dots from one space to another within your yard, accentuating its curves with boulders or plant material. And, not only do streams bring a beautiful sense of wonder to a space, they can serve the functional purpose of helping you manage drainage, too.

Waterfalls are another great way to add even more sound and drama to your yard. Like streams, they work well when there is a natural grade change, allowing you to take advantage of the drop from one space to another. However, this drop can be created quite effectively with boulders, as well.

Like fountains, waterfalls and streams require a bit of engineering to recirculate and maintain the water appropriately. However, unlike fountains, I’d recommend that you consider hiring a professional for installation, as there are a number of things that could go wrong during the process.

waterfall

Whether you’re looking to add the “oh-so-soothing” sounds that only running water can provide, or simply for a unique way to enhance the natural beauty and interest of your outdoor spaces, a water feature could be the answer. Because, let’s face it—everyone could use a little bit of liquid bliss!